If you have an ASP.NET website nested under another in IIS, you will likely get a server error unless both sites have exactly the same dependencies. This is because IIS, by default, applies web.config settings hierarchically to sub-sites. You can use this fact to your advantage, to prevent you having to repeat the same settings in the child site's web.config.
However, often, you will need certain configuration settings to apply only to the parent site. To restrict specific web.config sections to apply to the parent application only, wrap the relevant sections in the parent site's web config file within:
<location path="." inheritinchildapplications="false">
// your configuration sections
</location>
You can have as many of these location tags in your web.config as you like.
Note: Visual Studio 2005 will throw an error on the inheritInChildApplications attribute. To get round this you will need to add your location elements to web.config after you publish the site (or use VS 2008)
Thursday, 29 October 2009

Thursday, 9 April 2009
MS SQL Server How To - Creating relationships in a database diagram
This one had me scratching my head for 5 minutes, so I thought I would share it.
If you want to create relationships in your SQL Server 2005 database diagram:
If you want to create relationships in your SQL Server 2005 database diagram:
- Right-click the table that contains the foreign key (FK) in the forthcoming relationship.
- To create the relationship, click the ellipsis (...) box to the right of "Tables and Columns Specification". (This is quite hard to see.)
- In the Tables and Columns dialog, you can now select the tables, FK, and PK (Primary Key) that will participate in the relationship.
Monday, 19 January 2009
Empty div height issues in IE6
Sometimes your website will need to use empty divs for display purposes - e.g.: showing an image to make the top/bottom of an element look curved.
Typically, you would use an empty div, and set it's background image in css; but for floated or cleared elements, height is ignored. IE6 assumes that the element has text inside it, causing it to be slightly taller than the curved-top bg-image.
To correct this, explicitly set font-size:0; in css for the element with the curved bg-image.
Note - you must use an end tag to avoid any problems with the left or right padding. E.g.:
<div id="container_top_curve"></div>
Typically, you would use an empty div, and set it's background image in css; but for floated or cleared elements, height is ignored. IE6 assumes that the element has text inside it, causing it to be slightly taller than the curved-top bg-image.
To correct this, explicitly set font-size:0; in css for the element with the curved bg-image.
Note - you must use an end tag to avoid any problems with the left or right padding. E.g.:
<div id="container_top_curve"></div>
Tuesday, 25 November 2008
SSH connection limit per IP in Linux
Here's how to limit the maximum ssh connection attempts to your server. This guards against brute force attacks.
The following 2 rules will limit incoming connections to port 22 to no more than 3 attempts in a minute, any more than that will be dropped:
iptables -I INPUT tcp --dport 22 -i eth0 -m state --state NEW -m recent --set
iptables -I INPUT tcp --dport 22 -i eth0 -m state --state NEW -m recent --update --seconds 60 --hitcount 4 -j DROP
Enter the above commands one after another in the Linux terminal prompt. Substitute eth0 for whatever your network interface is called (it's usually eth0).
Here's a barebones test script you can use to prove the iptables rules are working:
#!/bin/bash
for i in 'seq 1 5' ; do
echo 'exit' | nc localhost 22 ;
done
Of course, you should also take other, simpler security measures like using strong passwords and limiting access times.
The following 2 rules will limit incoming connections to port 22 to no more than 3 attempts in a minute, any more than that will be dropped:
iptables -I INPUT tcp --dport 22 -i eth0 -m state --state NEW -m recent --set
iptables -I INPUT tcp --dport 22 -i eth0 -m state --state NEW -m recent --update --seconds 60 --hitcount 4 -j DROP
Enter the above commands one after another in the Linux terminal prompt. Substitute eth0 for whatever your network interface is called (it's usually eth0).
Here's a barebones test script you can use to prove the iptables rules are working:
#!/bin/bash
for i in 'seq 1 5' ; do
echo 'exit' | nc localhost 22 ;
done
Of course, you should also take other, simpler security measures like using strong passwords and limiting access times.
Monday, 24 November 2008
Installing an SSL certificate on IIS
An SSL certificate is used when a website wants to encrypt information between itelf and the end user. Whenever you see "https" at the start of a page's address, this means the site is using SSL. If you administer the server and want to use SSL to encrypt part, or all of your site, here is what to do:
First, you need to decide whether you want a self-signed or trusted certificate. A self-signed certificate is one that you create yourself within IIS. With a self-signed certificate, you are effectively saying "You can trust me". However, you can't be trusted.
It's nothing personal, it's just that browsers won't trust that you (your server) are who you say you are, for security purposes, unless you use a Trusted certificate. This is for the benefit of everyone on the web. All this means that if you have a public-facing website with a self-signed certificate installed, visitors to your website will see this message:
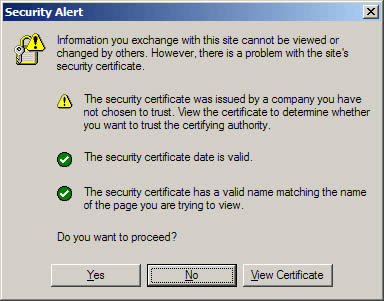
Not good. For anything other than testing/debugging, you will need a Trusted certificate. Where does one obtain such a thing? Why, from a Trusted Authority of course. Such as:
Before you buy a certificate, you'll need to create a Certificate Signing Request (CSR) in IIS. Microsoft has a simple guide to creating a certificate request. Once you have generated the CSR file, back it up mmediately. You'll find out why later. If you already have a self-signed certificate installed and want to replace in with a Trusted one, click here.
Now go ahead and buy the certificate you need. The trusted authority will need to be sent the text file that you generated during the certificate request. I'll leave that up to you. By the way, there's the obvious question that you may be asking - "Can I trust the trusted authority?". The trusted authority does some checks to ascertain that you are legitimate, or your business is legitimate. Can they be trusted to do this. In short, yes. They are vetted by internet authorities - becoming a trusted authority is not easy, and their business is built on their reputation, so it is in their interest to do their job as they should.
Anyway, I digress. At this point, assuming you aren't selling arms to rogue states, you will have passed the checks and the trusted authority will have sent you your certificate details. This email will include a long string of text called the "Certificate Signature" or "Global Server ID". This, effectively, IS the certificate. Here's what you need to do to use it (to replace an existing self signed certificate, see the next section...):
Here's how:
Cheers!
First, you need to decide whether you want a self-signed or trusted certificate. A self-signed certificate is one that you create yourself within IIS. With a self-signed certificate, you are effectively saying "You can trust me". However, you can't be trusted.
It's nothing personal, it's just that browsers won't trust that you (your server) are who you say you are, for security purposes, unless you use a Trusted certificate. This is for the benefit of everyone on the web. All this means that if you have a public-facing website with a self-signed certificate installed, visitors to your website will see this message:

Not good. For anything other than testing/debugging, you will need a Trusted certificate. Where does one obtain such a thing? Why, from a Trusted Authority of course. Such as:
Before you buy a certificate, you'll need to create a Certificate Signing Request (CSR) in IIS. Microsoft has a simple guide to creating a certificate request. Once you have generated the CSR file, back it up mmediately. You'll find out why later. If you already have a self-signed certificate installed and want to replace in with a Trusted one, click here.
Now go ahead and buy the certificate you need. The trusted authority will need to be sent the text file that you generated during the certificate request. I'll leave that up to you. By the way, there's the obvious question that you may be asking - "Can I trust the trusted authority?". The trusted authority does some checks to ascertain that you are legitimate, or your business is legitimate. Can they be trusted to do this. In short, yes. They are vetted by internet authorities - becoming a trusted authority is not easy, and their business is built on their reputation, so it is in their interest to do their job as they should.
Anyway, I digress. At this point, assuming you aren't selling arms to rogue states, you will have passed the checks and the trusted authority will have sent you your certificate details. This email will include a long string of text called the "Certificate Signature" or "Global Server ID". This, effectively, IS the certificate. Here's what you need to do to use it (to replace an existing self signed certificate, see the next section...):
- Copy the certificate signature into a new text file in notepad; save as a .txt file.
- Rename the .txt file - change the extension to .p7b.
- Move this file to your server, and process the pending request through IIS:
- Open Internet Information Services Manager.
- Browse to the website or Virtual Directory that you plan to secure.
- Right-click on the site/directory, then click properties.
- Click the Directory Security tab.
- Under Secure Communication click Server Certificate.
- In the Website Certificate Wizard, click Next.
- Choose to Process The Pending Request and Install The Certicicate, then click Next. The pending request must match the response file. If you deleted the Pending Request in error, you will have to generate a new CSR and replace the certificate. Not good if you've just spend a couple o' hundred big ones.
- Select the location of the certificate response file (p7b file) then click Next.
- Enter your SSL port (normally 443).
- REad the summary screen to be sure you are proccessing the correct certificate, then click Next.
- You will now see a confirmation screen. When you have read it, click Nex.
- You're done!
Here's how:
- Leave the site with the installed certificate alone.
- Create another virtual site with in IIS (does not have to be a functional site)
- Enter properties for the newly-created virtual site, then go to the certificate wizard to create a new certificate request. If you are renewing a trusted certificate, the information you enter on this CSR must exactly match the information on your production certificate, since the new CSR will be replacing it.
- When you receive your new certificate, install this certificate into the new virtual site that you created (follow the process above).
- Now delete the new virtual site.
- Go to your target web site. Use the certificate wizard - select Replace the Current Certificate. Choose the new certificate from the list.
- (Optional) When convenient, delete the old certificate using Microsoft Management Console (mmc). Add the Certificate Snap-In and delete the old SSL certificate.
- You're done!
Cheers!
Wednesday, 12 November 2008
Solving the Firefox feed display problem
I recently developed part of a website to show the company's latest news items on the front page. This used an xml file which is fomatted as an RSS 2.0 feed. The system admins can log into the management console and add new items to the news feed, which would then be transformed into html by an XSL stylesheet and displayed in an iframe.
Firefox however, would ignore the XSL and display the feed in it's standard format (example).
It turns out that when firefox parses xml for display, if it finds an rss or atom tag within the first 512 bytes, it automatically uses it's own format to display the feed within the browser. So if you don't want this behaviour, simply add a comment large enough to pad out the stuff before the feed tag to > 512 bytes:
Firefox however, would ignore the XSL and display the feed in it's standard format (example).
It turns out that when firefox parses xml for display, if it finds an rss or atom tag within the first 512 bytes, it automatically uses it's own format to display the feed within the browser. So if you don't want this behaviour, simply add a comment large enough to pad out the stuff before the feed tag to > 512 bytes:
<?xml version="1.0" encoding="utf-8"?>
<?xml-stylesheet type="text/xsl" href="../XSLT/rss2html_news.xsl"
version="1.0"?>
<!--This feed contains the company news information. It is
transformed to the News section using XSL. This Comment, being
longer than 512 bytes, is also intended as a work around to the
default RSS display behaviour of Firefox. ABCABCABCABCABCABCABC
ABCABCABCABCABCABCABCABCABCABCABCABCABCABCABCABCABC ABCABCABCAB
CABCABCABCABCABCABCABCABCABCABCABCABCABCABC-->
<rss version="2.0">
...
Subscribe to:
Posts (Atom)