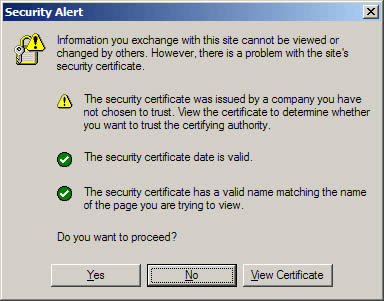
First, you need to decide whether you want a self-signed or trusted certificate. A self-signed certificate is one that you create yourself within IIS. With a self-signed certificate, you are effectively saying "You can trust me". However, you can't be trusted.
It's nothing personal, it's just that browsers won't trust that you (your server) are who you say you are, for security purposes, unless you use a Trusted certificate. This is for the benefit of everyone on the web. All this means that if you have a public-facing website with a self-signed certificate installed, visitors to your website will see this message:

Not good. For anything other than testing/debugging, you will need a Trusted certificate. Where does one obtain such a thing? Why, from a Trusted Authority of course. Such as:
Before you buy a certificate, you'll need to create a Certificate Signing Request (CSR) in IIS. Microsoft has a simple guide to creating a certificate request. Once you have generated the CSR file, back it up mmediately. You'll find out why later. If you already have a self-signed certificate installed and want to replace in with a Trusted one, click here.
Now go ahead and buy the certificate you need. The trusted authority will need to be sent the text file that you generated during the certificate request. I'll leave that up to you. By the way, there's the obvious question that you may be asking - "Can I trust the trusted authority?". The trusted authority does some checks to ascertain that you are legitimate, or your business is legitimate. Can they be trusted to do this. In short, yes. They are vetted by internet authorities - becoming a trusted authority is not easy, and their business is built on their reputation, so it is in their interest to do their job as they should.
Anyway, I digress. At this point, assuming you aren't selling arms to rogue states, you will have passed the checks and the trusted authority will have sent you your certificate details. This email will include a long string of text called the "Certificate Signature" or "Global Server ID". This, effectively, IS the certificate. Here's what you need to do to use it (to replace an existing self signed certificate, see the next section...):
- Copy the certificate signature into a new text file in notepad; save as a .txt file.
- Rename the .txt file - change the extension to .p7b.
- Move this file to your server, and process the pending request through IIS:
- Open Internet Information Services Manager.
- Browse to the website or Virtual Directory that you plan to secure.
- Right-click on the site/directory, then click properties.
- Click the Directory Security tab.
- Under Secure Communication click Server Certificate.
- In the Website Certificate Wizard, click Next.
- Choose to Process The Pending Request and Install The Certicicate, then click Next. The pending request must match the response file. If you deleted the Pending Request in error, you will have to generate a new CSR and replace the certificate. Not good if you've just spend a couple o' hundred big ones.
- Select the location of the certificate response file (p7b file) then click Next.
- Enter your SSL port (normally 443).
- REad the summary screen to be sure you are proccessing the correct certificate, then click Next.
- You will now see a confirmation screen. When you have read it, click Nex.
- You're done!
Here's how:
- Leave the site with the installed certificate alone.
- Create another virtual site with in IIS (does not have to be a functional site)
- Enter properties for the newly-created virtual site, then go to the certificate wizard to create a new certificate request. If you are renewing a trusted certificate, the information you enter on this CSR must exactly match the information on your production certificate, since the new CSR will be replacing it.
- When you receive your new certificate, install this certificate into the new virtual site that you created (follow the process above).
- Now delete the new virtual site.
- Go to your target web site. Use the certificate wizard - select Replace the Current Certificate. Choose the new certificate from the list.
- (Optional) When convenient, delete the old certificate using Microsoft Management Console (mmc). Add the Certificate Snap-In and delete the old SSL certificate.
- You're done!
Cheers!
1 comment:
Thanks for sharing this. I found this a really easy walkthrough as I'm currently setting up indepedently my own firms SSL certification for one of our sites. A work associate of mine recommended SSL 247 as the UKs leading reseller of SSL Certificates and all the ones you have mentioned. I have found them to be very technical and informative.
Post a Comment