In Windows and Linux, the mechanisms for automating tasks are quite different, so in will cover Linux in a future post. In windows, you typically write an application/script, then run it as a Scheduled Task. If you need to run a task when the computer starts, or before you login, or even automatically login, or run it continuously in the background, there are other options, which I will cover in another post.
Windows Scheduled Tasks
Once you have a program or script that you want to automate, go to Programs -> Accessories -> System Tools -> Scheduled Tasks. In the window, double-click Add Scheduled Task. Click next, then click Browse to choose your program (sorry about the blue lines):
 Once you have chosen the task, click Next. Next, select the scheduling of your task - Daily, Weekly, etc. Don't worry about choosing the wrong option here, as we can configure the scheduling in the Advanced Options.
You will also be prompted for your username and password. Enter your username in the format Computer Name/Username. You can find your computer name by right-clicking My Computer and selecting the "Computer Name" tab. It is next to "Full Computer Name".
Click next, and you should see the following screen:
 If you are happy with the simple scheduling options you have just chosen, go ahead and click Finish. If you want to tweak the schedule, check "Open advanced properties..." then click Finish.
Let's take a look at the options available in the advanced properties.
First the Task tab:
 Run: Here you specify the executable or script to run at the scheduled times (I have used Character Map as an example). You probably won't need to change this unless you have made a mistake in one of the previous steps. If you need to add arguments to your program, add them here (eg: ...\myprog.exe -verbose -init). Remember, however, that if the path to your program contains spaces, this cause problems (e.g.: you may have your program under "Documents and Settings\...". Windows assumes that spaces are separators, and will therefore complain that "Documents is not a program... etc". To get around this, just enclose your path in quotes. For example:
"C:\Documents and Settings\Username\Adminprogs\cleanup.exe" -auto -init. Note that the arguments are outside the quotes.
Start in: Normally, the path to the folder containing your program/script. If you program uses other files, you can add the paths to these here - separate paths with commas.
Comments: You can add information in here for other system administrators to read.
Run As: This is the Computer/Username combo again. You can usually just run this as yourself - you may wish to create a new non-admin user just to run tasks like this. Note that if the password is changed for this user account, the scheduled task will stop working. You can use the "Set Password" button if this happens.
Run only is logged on: Self-explanatory.
Enabled: Self-explanatory. You can uncheck this box to temporariliy disable the task.
Now, the Schedule tab:

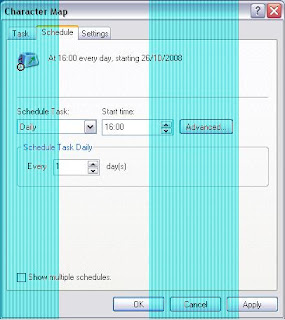
Most of this tab is self-explanatory, but there are a lot of possibilities here, so I will work through an example using a typical schedule. I will configure the task to run at 1am and 1pm on weekdays.
There are 2 ways to do this.
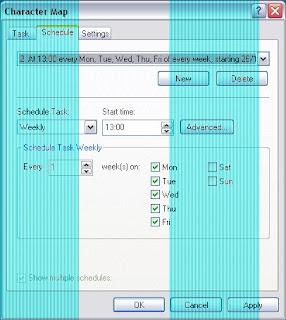
- Schedule the task "Weekly", choose Mon-Fri from the options, and from the Advanced schedule options choose to repeat the task every 12 hours until 13:01. The reason we choose 13:01, not 13:00 is because we want to make sure the task runs at 13:00, then we can stop repeating it. You should end up like this:
- Now the alternative. Again, schedule the task weekly and select Mon-Fri. However, instead of repeating the task, add a 2nd schedule - every week day at 13:00. So now your task has 2 schedules - every weekday at 01:00 and every weekday at 13:00. To do this, check "Show Multiple Schedules" and click "New..." at the top. Set the Start Time of this sub-task to 13:00:

Now, the Settings tab:
 The options hereare mostly self-explanatory. Choose whatever suits you. One that I will comment on is the "Stop the task if it runs for..." option. If your program/script has a tendency to hang, you may want to set this option to prevent it from using up system resources or crashing the computer.
Press OK. You may be prompted to enter your password. That's all!

No comments:
Post a Comment