Here's how to limit the maximum ssh connection attempts to your server. This guards against brute force attacks.
The following 2 rules will limit incoming connections to port 22 to no more than 3 attempts in a minute, any more than that will be dropped:
iptables -I INPUT tcp --dport 22 -i eth0 -m state --state NEW -m recent --set
iptables -I INPUT tcp --dport 22 -i eth0 -m state --state NEW -m recent --update --seconds 60 --hitcount 4 -j DROP
Enter the above commands one after another in the Linux terminal prompt. Substitute eth0 for whatever your network interface is called (it's usually eth0).
Here's a barebones test script you can use to prove the iptables rules are working:
#!/bin/bash
for i in 'seq 1 5' ; do
echo 'exit' | nc localhost 22 ;
done
Of course, you should also take other, simpler security measures like using strong passwords and limiting access times.
Tuesday, 25 November 2008
Monday, 24 November 2008
Installing an SSL certificate on IIS
An SSL certificate is used when a website wants to encrypt information between itelf and the end user. Whenever you see "https" at the start of a page's address, this means the site is using SSL. If you administer the server and want to use SSL to encrypt part, or all of your site, here is what to do:
First, you need to decide whether you want a self-signed or trusted certificate. A self-signed certificate is one that you create yourself within IIS. With a self-signed certificate, you are effectively saying "You can trust me". However, you can't be trusted.
It's nothing personal, it's just that browsers won't trust that you (your server) are who you say you are, for security purposes, unless you use a Trusted certificate. This is for the benefit of everyone on the web. All this means that if you have a public-facing website with a self-signed certificate installed, visitors to your website will see this message:
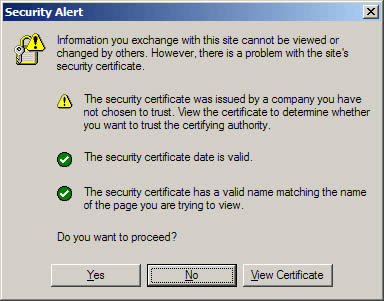
Not good. For anything other than testing/debugging, you will need a Trusted certificate. Where does one obtain such a thing? Why, from a Trusted Authority of course. Such as:
Before you buy a certificate, you'll need to create a Certificate Signing Request (CSR) in IIS. Microsoft has a simple guide to creating a certificate request. Once you have generated the CSR file, back it up mmediately. You'll find out why later. If you already have a self-signed certificate installed and want to replace in with a Trusted one, click here.
Now go ahead and buy the certificate you need. The trusted authority will need to be sent the text file that you generated during the certificate request. I'll leave that up to you. By the way, there's the obvious question that you may be asking - "Can I trust the trusted authority?". The trusted authority does some checks to ascertain that you are legitimate, or your business is legitimate. Can they be trusted to do this. In short, yes. They are vetted by internet authorities - becoming a trusted authority is not easy, and their business is built on their reputation, so it is in their interest to do their job as they should.
Anyway, I digress. At this point, assuming you aren't selling arms to rogue states, you will have passed the checks and the trusted authority will have sent you your certificate details. This email will include a long string of text called the "Certificate Signature" or "Global Server ID". This, effectively, IS the certificate. Here's what you need to do to use it (to replace an existing self signed certificate, see the next section...):
Here's how:
Cheers!
First, you need to decide whether you want a self-signed or trusted certificate. A self-signed certificate is one that you create yourself within IIS. With a self-signed certificate, you are effectively saying "You can trust me". However, you can't be trusted.
It's nothing personal, it's just that browsers won't trust that you (your server) are who you say you are, for security purposes, unless you use a Trusted certificate. This is for the benefit of everyone on the web. All this means that if you have a public-facing website with a self-signed certificate installed, visitors to your website will see this message:

Not good. For anything other than testing/debugging, you will need a Trusted certificate. Where does one obtain such a thing? Why, from a Trusted Authority of course. Such as:
Before you buy a certificate, you'll need to create a Certificate Signing Request (CSR) in IIS. Microsoft has a simple guide to creating a certificate request. Once you have generated the CSR file, back it up mmediately. You'll find out why later. If you already have a self-signed certificate installed and want to replace in with a Trusted one, click here.
Now go ahead and buy the certificate you need. The trusted authority will need to be sent the text file that you generated during the certificate request. I'll leave that up to you. By the way, there's the obvious question that you may be asking - "Can I trust the trusted authority?". The trusted authority does some checks to ascertain that you are legitimate, or your business is legitimate. Can they be trusted to do this. In short, yes. They are vetted by internet authorities - becoming a trusted authority is not easy, and their business is built on their reputation, so it is in their interest to do their job as they should.
Anyway, I digress. At this point, assuming you aren't selling arms to rogue states, you will have passed the checks and the trusted authority will have sent you your certificate details. This email will include a long string of text called the "Certificate Signature" or "Global Server ID". This, effectively, IS the certificate. Here's what you need to do to use it (to replace an existing self signed certificate, see the next section...):
- Copy the certificate signature into a new text file in notepad; save as a .txt file.
- Rename the .txt file - change the extension to .p7b.
- Move this file to your server, and process the pending request through IIS:
- Open Internet Information Services Manager.
- Browse to the website or Virtual Directory that you plan to secure.
- Right-click on the site/directory, then click properties.
- Click the Directory Security tab.
- Under Secure Communication click Server Certificate.
- In the Website Certificate Wizard, click Next.
- Choose to Process The Pending Request and Install The Certicicate, then click Next. The pending request must match the response file. If you deleted the Pending Request in error, you will have to generate a new CSR and replace the certificate. Not good if you've just spend a couple o' hundred big ones.
- Select the location of the certificate response file (p7b file) then click Next.
- Enter your SSL port (normally 443).
- REad the summary screen to be sure you are proccessing the correct certificate, then click Next.
- You will now see a confirmation screen. When you have read it, click Nex.
- You're done!
Here's how:
- Leave the site with the installed certificate alone.
- Create another virtual site with in IIS (does not have to be a functional site)
- Enter properties for the newly-created virtual site, then go to the certificate wizard to create a new certificate request. If you are renewing a trusted certificate, the information you enter on this CSR must exactly match the information on your production certificate, since the new CSR will be replacing it.
- When you receive your new certificate, install this certificate into the new virtual site that you created (follow the process above).
- Now delete the new virtual site.
- Go to your target web site. Use the certificate wizard - select Replace the Current Certificate. Choose the new certificate from the list.
- (Optional) When convenient, delete the old certificate using Microsoft Management Console (mmc). Add the Certificate Snap-In and delete the old SSL certificate.
- You're done!
Cheers!
Wednesday, 12 November 2008
Solving the Firefox feed display problem
I recently developed part of a website to show the company's latest news items on the front page. This used an xml file which is fomatted as an RSS 2.0 feed. The system admins can log into the management console and add new items to the news feed, which would then be transformed into html by an XSL stylesheet and displayed in an iframe.
Firefox however, would ignore the XSL and display the feed in it's standard format (example).
It turns out that when firefox parses xml for display, if it finds an rss or atom tag within the first 512 bytes, it automatically uses it's own format to display the feed within the browser. So if you don't want this behaviour, simply add a comment large enough to pad out the stuff before the feed tag to > 512 bytes:
<?xml version="1.0" encoding="utf-8"?>
<?xml-stylesheet type="text/xsl" href="../XSLT/rss2html_news.xsl"
version="1.0"?>
<!--This feed contains the company news information. It is
transformed to the News section using XSL. This Comment, being
longer than 512 bytes, is also intended as a work around to the
default RSS display behaviour of Firefox. ABCABCABCABCABCABCABC
ABCABCABCABCABCABCABCABCABCABCABCABCABCABCABCABCABC ABCABCABCAB
CABCABCABCABCABCABCABCABCABCABCABCABCABCABC-->
<rss version="2.0">
...
Monday, 27 October 2008
Automating tasks in Linux
In Linux, the "crontab" command can be used to schedule tasks. Unlike Windows, it provides a command-based interface, rather than a graphical interface, but it can be configured extremely quickly and comes with a set of very useful options. To see all options, type "man crontab" into a terminal window. To add a new "cron job", simply enter the following into a terminal:
crontab -e
Let's look at a typical example. Say I want to want to run a subversion (SVN) backup script at 3am every Tuesday, and I want to write all output (including errors) to a logfile. I would add the following cron job:
0 3 * * 2 /home/username/backup/svn_backup.sh >/tmp/svn_backup_log.out 2>&1
Let's break down the above command:
If you are curious about the svn backup script, let me know and I will write it up in a future post.
crontab -e
Let's look at a typical example. Say I want to want to run a subversion (SVN) backup script at 3am every Tuesday, and I want to write all output (including errors) to a logfile. I would add the following cron job:
0 3 * * 2 /home/username/backup/svn_backup.sh >/tmp/svn_backup_log.out 2>&1
Let's break down the above command:
- 0 3 * * 2
- The first part of all cron commands is the same, containing 5 fields: (1) minute(0-59) (2) hour(0-23) (3) day_of_month(0-31) (4) month(1-12) (5) day_of_week(0-7 | where Sunday is 0 or 7)
- To ignore any field, simply use an asterisk for that field ('*')
- /home/username/backup/svn_backup.sh
- This is the script to run
- >/tmp/svn_backup_log.out
- Tells cron where to write any standard output from the script (will be overwritten at each run)
- 2>&1
- Tells cron to write any errors to the same place as standard output
If you are curious about the svn backup script, let me know and I will write it up in a future post.
Sunday, 26 October 2008
Automating tasks in Windows
If you find yourself endlessly performing monotonous tasks as part of your admin work, you may be able to leverage your operating system's built-in automation mechanism. Tasks ideal for this include backup, tidying up filesystems and automated messaging. (Windows also includes a standalone backup program, which I will cover in another post.)
In Windows and Linux, the mechanisms for automating tasks are quite different, so in will cover Linux in a future post. In windows, you typically write an application/script, then run it as a Scheduled Task. If you need to run a task when the computer starts, or before you login, or even automatically login, or run it continuously in the background, there are other options, which I will cover in another post.
Windows Scheduled Tasks
Once you have a program or script that you want to automate, go to Programs -> Accessories -> System Tools -> Scheduled Tasks. In the window, double-click Add Scheduled Task. Click next, then click Browse to choose your program (sorry about the blue lines):
 Once you have chosen the task, click Next. Next, select the scheduling of your task - Daily, Weekly, etc. Don't worry about choosing the wrong option here, as we can configure the scheduling in the Advanced Options.
You will also be prompted for your username and password. Enter your username in the format Computer Name/Username. You can find your computer name by right-clicking My Computer and selecting the "Computer Name" tab. It is next to "Full Computer Name".
Click next, and you should see the following screen:
 If you are happy with the simple scheduling options you have just chosen, go ahead and click Finish. If you want to tweak the schedule, check "Open advanced properties..." then click Finish.
Let's take a look at the options available in the advanced properties.
First the Task tab:
 Run: Here you specify the executable or script to run at the scheduled times (I have used Character Map as an example). You probably won't need to change this unless you have made a mistake in one of the previous steps. If you need to add arguments to your program, add them here (eg: ...\myprog.exe -verbose -init). Remember, however, that if the path to your program contains spaces, this cause problems (e.g.: you may have your program under "Documents and Settings\...". Windows assumes that spaces are separators, and will therefore complain that "Documents is not a program... etc". To get around this, just enclose your path in quotes. For example:
"C:\Documents and Settings\Username\Adminprogs\cleanup.exe" -auto -init. Note that the arguments are outside the quotes.
Start in: Normally, the path to the folder containing your program/script. If you program uses other files, you can add the paths to these here - separate paths with commas.
Comments: You can add information in here for other system administrators to read.
Run As: This is the Computer/Username combo again. You can usually just run this as yourself - you may wish to create a new non-admin user just to run tasks like this. Note that if the password is changed for this user account, the scheduled task will stop working. You can use the "Set Password" button if this happens.
Run only is logged on: Self-explanatory.
Enabled: Self-explanatory. You can uncheck this box to temporariliy disable the task.
Now, the Schedule tab:
Most of this tab is self-explanatory, but there are a lot of possibilities here, so I will work through an example using a typical schedule. I will configure the task to run at 1am and 1pm on weekdays.
There are 2 ways to do this.
Now, the Settings tab:
 The options hereare mostly self-explanatory. Choose whatever suits you. One that I will comment on is the "Stop the task if it runs for..." option. If your program/script has a tendency to hang, you may want to set this option to prevent it from using up system resources or crashing the computer.
Press OK. You may be prompted to enter your password. That's all!
In Windows and Linux, the mechanisms for automating tasks are quite different, so in will cover Linux in a future post. In windows, you typically write an application/script, then run it as a Scheduled Task. If you need to run a task when the computer starts, or before you login, or even automatically login, or run it continuously in the background, there are other options, which I will cover in another post.
Windows Scheduled Tasks
Once you have a program or script that you want to automate, go to Programs -> Accessories -> System Tools -> Scheduled Tasks. In the window, double-click Add Scheduled Task. Click next, then click Browse to choose your program (sorry about the blue lines):
 Once you have chosen the task, click Next. Next, select the scheduling of your task - Daily, Weekly, etc. Don't worry about choosing the wrong option here, as we can configure the scheduling in the Advanced Options.
You will also be prompted for your username and password. Enter your username in the format Computer Name/Username. You can find your computer name by right-clicking My Computer and selecting the "Computer Name" tab. It is next to "Full Computer Name".
Click next, and you should see the following screen:
 If you are happy with the simple scheduling options you have just chosen, go ahead and click Finish. If you want to tweak the schedule, check "Open advanced properties..." then click Finish.
Let's take a look at the options available in the advanced properties.
First the Task tab:
 Run: Here you specify the executable or script to run at the scheduled times (I have used Character Map as an example). You probably won't need to change this unless you have made a mistake in one of the previous steps. If you need to add arguments to your program, add them here (eg: ...\myprog.exe -verbose -init). Remember, however, that if the path to your program contains spaces, this cause problems (e.g.: you may have your program under "Documents and Settings\...". Windows assumes that spaces are separators, and will therefore complain that "Documents is not a program... etc". To get around this, just enclose your path in quotes. For example:
"C:\Documents and Settings\Username\Adminprogs\cleanup.exe" -auto -init. Note that the arguments are outside the quotes.
Start in: Normally, the path to the folder containing your program/script. If you program uses other files, you can add the paths to these here - separate paths with commas.
Comments: You can add information in here for other system administrators to read.
Run As: This is the Computer/Username combo again. You can usually just run this as yourself - you may wish to create a new non-admin user just to run tasks like this. Note that if the password is changed for this user account, the scheduled task will stop working. You can use the "Set Password" button if this happens.
Run only is logged on: Self-explanatory.
Enabled: Self-explanatory. You can uncheck this box to temporariliy disable the task.
Now, the Schedule tab:

Most of this tab is self-explanatory, but there are a lot of possibilities here, so I will work through an example using a typical schedule. I will configure the task to run at 1am and 1pm on weekdays.
There are 2 ways to do this.
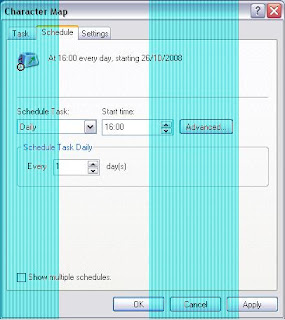
- Schedule the task "Weekly", choose Mon-Fri from the options, and from the Advanced schedule options choose to repeat the task every 12 hours until 13:01. The reason we choose 13:01, not 13:00 is because we want to make sure the task runs at 13:00, then we can stop repeating it. You should end up like this:

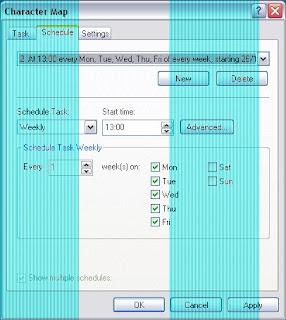
- Now the alternative. Again, schedule the task weekly and select Mon-Fri. However, instead of repeating the task, add a 2nd schedule - every week day at 13:00. So now your task has 2 schedules - every weekday at 01:00 and every weekday at 13:00. To do this, check "Show Multiple Schedules" and click "New..." at the top. Set the Start Time of this sub-task to 13:00:


Now, the Settings tab:
 The options hereare mostly self-explanatory. Choose whatever suits you. One that I will comment on is the "Stop the task if it runs for..." option. If your program/script has a tendency to hang, you may want to set this option to prevent it from using up system resources or crashing the computer.
Press OK. You may be prompted to enter your password. That's all!
Friday, 24 October 2008
Forcing restart in Windows and Linux
Sometimes it becomes necessary to restart a server or other remote system. Windows is especially problematic, as it will often wait on a hung application to end before shutting down.
Thankfully, there is a command to help, the "shutdown" command. If you are remotely logged in, simply open a command prompt (Start -> Run -> type "cmd" -> OK). In the command prompt, enter the following:
shutdown -t 0 -r -f
There are other options (to view them all, type "shutdown --help" into the command prompt); but I will summarise the ones above:
shutdown now -r
Enter the above command in a terminal window to force an immediate restart.
Thankfully, there is a command to help, the "shutdown" command. If you are remotely logged in, simply open a command prompt (Start -> Run -> type "cmd" -> OK). In the command prompt, enter the following:
shutdown -t 0 -r -f
There are other options (to view them all, type "shutdown --help" into the command prompt); but I will summarise the ones above:
- -t 0
- This sets a timeout of zero seconds before shutting down
- -r
- This specifies a restart
- -f
- Forces all open programs to close immediately
shutdown now -r
Enter the above command in a terminal window to force an immediate restart.
Subscribe to:
Posts (Atom)